Friday, June 27, 2014

Scrapadabadoo’s Sizzling Summer Blog Hop

 
If you’ve come here from Jess’s blog then you are on the right track, if not please go to http://www.scrapadabadoo.blogspot.com/ to start the ride from the beginning.
 
SHIP WRECKED
I love all things about the beach….the sun and sand, the waves, the water…what’s not to love so that’s why I instantly knew when I received my bike http://www.scrapadabadoo.com/item_7117/Prima-Bicycle-Frame.htm from Scrapadabadoo I was going to decorate it in a beach theme.
010
I started by giving my bike a light whitewash with a dry brush of gesso as well as on the base the bike is sitting on.  The base didn’t need much as it already looked like a piece of driftwood. I then wrapped the frame of my bike with some rope.
006
I decorated the inside of my bike with the large gear die cut from the Tim Holtz Gadget Gears Die http://www.scrapadabadoo.com/item_7063/Sizzix-Bigz-Gadget-Gears-Die.htm.  I covered it with the wood grain paper http://www.scrapadabadoo.com/item_4659/Med-Brown-Wood-Grain-6pk-8.5x11.htm then inked it with vintage photo distress ink.  I thought it looked like a ships wheel. I added a sand dollar cut out of chipboard using Tim Holtz’s new Sand & Sea die.  I used the same die to cut the seahorse out of chipboard.  I painted it then added crackle accents.
005
009
001
I added some beach sand to the base much like you would adhere glitter.  I put down a thick coating of glossy accents then sprinkled the sand then allowed it to dry thoroughly.  I also tucked in some shells here and there using Ranger Matte multi-medium http://www.scrapadabadoo.com/item_3919/Ranger-Matte-Medium-4oz.htm  I find it’s the best medium to adhere bulky items like these.
011
The anchor die was cut out of 2 layers of heavy weight cardstock to give it some stability then painted with several colors of metallic paints to give it an authentic metal look.  I used a small glass vial to create a message in a bottle.
007
008
 
Hopefully you all started with Scrapadabadoo.blogspot.com.  Then followed the blogs in order. Along the way you will want to collect the letter that is on each blog, and also leave a comment on that blog. After you have collected all of the letters.. you will then unscramble the letter to form a word or words. Once you have unscrambled the letters send your word or words in an e mail to Scrapadabadoo@comcast.net.  They will be giving away a Prima Bike to one lucky winner
Altered Metal Bike Frame small
as well as three $25 gift certificates to the store. You will have until Tuesday July 1st to enter to win and they will announce the winners in The news letter and on the blog Wednesday July 3rd.
 
Here is my secret letter.  Since I was the last stop on the hop you should now have all of the letters necessary to unscramble your word or words. Be sure to leave a comment below then email Scrapadabadoo@comcast.net. with your word or words.
secret letter sign E
  Thank you all for riding along with us all on our first Scrapadabadoo’s design team blog hop.  We hope it’s been as much fun for all of you as it has been for all of us.


Thursday, June 19, 2014

Always & Forever


Always & Forever
 
Hi, Patti here with another Scrapadabadoo design team layout.   I used the beautiful Somewhere in Time collection by BoBunny http://www.scrapadabadoo.com/item_6993/BoBunny-Somewhere-In-Time-Collection.htm.  I trimmed 1/4” off of one horizontal edge and 1/4” of of one vertical edge of the paper then matted it on a piece of black cardstock from the coordinated cardstock collection http://www.scrapadabadoo.com/item_7021/BoBunny-Somwhere-Cardtock-Pack.htm  I heavily distressed the edges of the patterned paper with the Prima Distress Tool http://www.scrapadabadoo.com/item_5301/Prima-Distressing-Tool.htm
Always & Forever - Copy (2)
 
I distressed deeper in a few spots to expose more of the background paper but to add more interest and dimension, I added strips of drywall tape.  I love using drywall tape on my masculine pages…there are a lot of feminine embellies in the market, but not as much for the men in our lives so drywall tape has become a go to for me since I have 2 grandsons.
 
Always & Forever - Copy (4)
 
Next, I mixed some silver acrylic paint with some Goldens light modeling paste and used aTim Holtz stencil  http://www.scrapadabadoo.com/item_5661/Tim-Holtz-Measured-Stencil.htm and a Crafter’s Workshop mini stencil http://www.scrapadabadoo.com/item_4912/Crafters-Mini-Tiny-Circles-Template.htm.  I then randomnly on purpose stenciled around the page…if there is such a thing. 
 
I also misted around the page using Ranger Perfect Pearls mist in pewter and Tattered Angels Glimmer Mist in Piece of Heart both of which I’ve had in my stash forever.
 
Always & Forever - Copy (3)
 
Next, I randomnly on purposed stamped in Black Archival in by Ranger http://www.scrapadabadoo.com/item_2447/Ranger-Archival-Ink-Pad-Black.htm using the Indigoblu bubbles stamp http://www.scrapadabadoo.com/item_6782/IndigoBlu-Bubbles-Background-Stamp.htm which is my new favorite background stamp.
 
Somewhere in time 018
 
Now that my background paper was all prepared I was ready for the photo and embellishments.  I mounted my 4 x 6 photo that I double matted exposing a 1/8” border on a scrap piece of chipboard so I have room to tuck some embellishments under the photo.
 
Always & Forever - Copy
 
I diecut 2 gears from Tim Holtz gadgets and gear die out of chipboard http://www.scrapadabadoo.com/item_7063/Sizzix-Bigz-Gadget-Gears-Die.htm and painted them in silver acrylic paint, topped it with a flower made with the Tim Holtz tattered floral die http://www.scrapadabadoo.com/item_219/Sizzix-Bigz-Tattered-Florals-By-Tim-Holtz.htm and http://www.scrapadabadoo.com/item_3167/Sizzix-Tattered-Flower-Border-Die.htm.  I misted the flowers with the same Pewter and  Piece of My Heart mist I used on the page to masculine them up and because flowers have to have leaves I stamped and hand cut them out. 
To complete the page and reinforce the masculine look, I added some Tim Holtz mini gears http://www.scrapadabadoo.com/item_3328/Tim-Holtz-Mini-Gears.htm and some jewels from the collection http://www.scrapadabadoo.com/item_6996/BoBunny-Somewhere-In-Time-Jewels.htm
 
Always & Forever
 
This was my attempt at making what I call an artsy, fartsy, mixed media, collage type page.   I need some more practice but I didn't do too bad for my first time if I don’t say so myself…LOL
 
Thank you for looking. ~Patti~

Sunday, June 8, 2014

LOVELY

Hi everyone,
Here’s a page I did along time ago but never posted.
This is a 4 x 6 vertical photo of my daughter when she was 8 months pregnant with her 2nd son.
Lovely 005
She had some professional photos taken and they turned out well, lovely.
The paper is from one of my favorite Basic Grey collections call Serenade.  I backed the layout with a solid piece of black cardstock.  It helps to draw your eye to the photo.
I layered my photo with a scrap piece of Prima Engraver collection and double matted the photo.
I embellished with some handmade flowers, some punched butterflies and flourishes die cut with the Fancy Flourish die by Cheery Lynn all clustered around a handmade bow using my all time favorite ribbon by May Arts in black and cream stripe.
Thank you for looking.  ~Patti~

Saturday, May 31, 2014

Time Traveler Memories accordion tag album

 
Hi everyone, Patti here with my addition to the Time Traveler series for Scrapadabadoo’s Ustream launch.
I created an accordion fold tag album for the time capsule created by Jen.  You can see her gorgeous Time Capsule here http://www.ozegran.blogspot.com/
This entire album is made using the Time Traveler collection by Prima Marketing.  I will add the products used at the end of this post.  This is a photo heavy post so grab a fresh cup of your favorite beverage of choice, relax and come travel in time with me.
 
027
 I started with 5 black tags that Carol & Barrie from Scrapadabadoo sent us that measure 6 1/4 x 3 1/8th.  I just covered the tags with my favorite papers of the collection, added some of the crystals and a button and the wood veneer. I also put one of my favorite diecuts flourishes by Cheery Lynn.
019
You can see here how the entire mini album stands on it’s own for easy display.
014
 
018
 
028
Since this is going in a time capsule, I wanted to not only create a piece to put photos that can be viewed by future generations, I also wanted to create a piece that exhibited some of the trendy scrapbooking styles of today.  On the tag to the left with the wood veneer finger, I created a file folder using the W R Memory Keepers envelope punch board that is so trending now in the scrapbooking industry.  I started with a square piece of patterned paper from the collection cut at 6" x 5 1/4", then I scored down the middle.  I then punched the file tab on the left side of the paper of the 5 1/4 " side which left my tab at the top once folded.  I then used one of the Tim Holtz mini clips to keep it closed. You can see in the photo below that the file folder opens to reveal a pocket for some small photos and/or journaling or any memorabilia. I added 3 more tags cut to the following sizes, 4 3/4 x 2 3/8, 3 3/4 x 2 3/8 and the smallest tag is 3 1/4 x 1 5/8.
The tag on the right I created a pocket using one of the ATC cards as the front of the pocket. This is  to portray the pocketed style scrapbooking that is so popular right now.
029
030
The tag on the left of this photo was inspired by the May tag done by Tim Holtz that can be seen here http://timholtz.com/12-tags-of-2014-may/.  When is Tim never not trendy right?
The tag on the right of this photo I recreated the same type of pocket only this time I added a bit of lace to honor the vintage style which is has been very popular with a lot of crafters for several years.

 I think it will be really fun to pull this mini album out of the time capsule in 10, 20 or more years from now and compare how the scrapbooking styles have changed.  Don't you?
 
020
Below is a photo of the back of this album.  I wasn’t sure exactly what I wanted to do so I sent some photos to Barrie Matthews of Scrapadabadoo for some advice and she immediately knew what it needed.  She suggested I put some diagonal pockets and some photo mats. It’s amazing what a fresh set of eyes can see.  Thank you Barrie. 
022
The next couple of photos show the tags and photo mats for photos and or journaling.
023
The tags measure as follows: 4 3/4 x 2 3/8 and 3 1/4 x 1 5/8.  The photo mats are the ATC cards that come with the collection and make perfect mats for 3 3/4 x 2 3/4 photos.

025024026
I had the best time creating this album with this beautiful collection.
Thank you for staying with me while I traveled in time with Scrapadabadoo as they premiered their debut on Ustream.
Be sure to follow them here
Products:

Wednesday, May 21, 2014

Scrapadabadoo Invites you to join us as we
 
Our wonderful design team have joined in together to show you just how much fun, and how many things you can create with just one paper line. They will each be using the Prima Time Traveler Collection and their projects are amazing. We do have the entire Collection in Stock.
Our other Team Members,
Gwen
Wendy
Patti
Margaret Ann
Debi
Jessie
and Kim
Will be posting on the face book page during the day. As well as on their blogs.  You can find more information on each of their pages as to what supplies are used, cutting guides and any down loads that are needed.
 
Our First show will start off with Zandra and she will be creating this amazing mini. We love Zandra's work and you can always be sure that she will show us how to think outside the box, and how we can use our supplies in ways you would never imagine.
 
Next up we will have Jani working on something we can all use.. A magnetic Calendar that is two sided !!
As we all know, Jani is an amazing crafter known for her beautiful flowers and this creation is nothing short of wonderful ...
As we move from show to show, be sure to have a peek at the amazing things being posted on face book.. our gals have been working hard and we are so delighted with it all !!!
 
Next, we will be joined by Ashliegh who will be creating  a multi layer box that can hold Zandra's mini in the drawer and a ton of other things in the top. Ashliegh continues to amaze us and She says this is simple to make too !!
 
We will end our day in Australia  with Jen
as she creates this amazing time capsule to hold all of todays memories, notes and things to give to her young Granddaughter on her wedding day. 
What a great gift this will be and what a work of art to hold things of the heart...
 
 
  '
As we said all of the projects will be created using the prima Time Traveler.. and you can find more information on each of the blogs later this week.
Zandra:  Scraps To Beauty   


Jen: Jens Joint  
 
All of the design team blog addresses can be found on the lower left of the news letter, or by visiting our Face Book Page and Clicking on Files. 
 So Grab your favorite finger food, your drink of choice, your fun supplies and join us for a day of fun.. Oh and between now and then, be sure to check out the Store Garage Sale.  Rock bottom prices on products that have outstayed their welcome and are looking for a new home ( yours)
Don't forget to Join Zandra this evening and Jen on Aussie Time On Thursday !!

Wednesday, May 14, 2014

GONE FISHIN'


Hi, Another Scrapadabadoo design team project here with a super quick and easy 6 x 6 mini album I made using DCWV burlap collection that I combined with Tim Holtz Wallflower paper using the 6 x 6 squares.  I love that his paper pads have 12 x 12, 6 x 6 and ATC size papers.  It makes his pads a great bang for the buck and very versatile.
 
 
I made some flowers using the Sizzix Tim Holtz tattered floral die that I inked with Distress ink in mustard seed and a touch of vintage photo and the leave were inked with mowed lawn and crushed olive adding vintage photo on the edges.   I then coated the flowers and leaves with Claudine Helmuth Matte medium.  It gave them a worn leather look and I find that it also protects them.


I made a pocket in order to add a tag for some journaling that I covered in a piece of Kaisercraft Base Coat paper which just so happen to coordinate with this collection perfectly.

I also cut the edges with the Tim Holtz Baroque On the Edge die for some interest.   The burlap frayed slightly in some places, but I like the organic look it gave and thought it went well with the paper collection and the photos.

I also used a large eyelet as my closure that I could hook a Tim Holtz swivel clasp through...I thought it sort of resembled a fishing hook.
 

I kept the pages on the inside pretty simple and much the same for continuity and it made the whole project very quick to put together.  I also printed my photos in 4 x 6 and I didn't need to crop them down too much at all.

I just tied a piece of twine with a Tim Holtz word charm tied through and completed the look with a flower either punched or diecut. 
 
I used some of the Tim Holtz Nature rub-ons on some of the more neutral papers for some added interest.
 
All of the photos are of my 8 year old grandson, Maddox.   He had been wanting to go fishing so Papa (grandpa) and I took him to the inter-coastal in Cocoa Beach one afternoon to cast a few.  I'd like to say he caught a big one and it got away, but I'd be lying, regardless, he had the best time.  Of course, being the true scrapper and Grammy I always have my camera ready in hopes of snapping some scrap worthy photos. 
I put the whole album together with my often neglected Bind It All.

Thank you for looking.

Wednesday, April 30, 2014

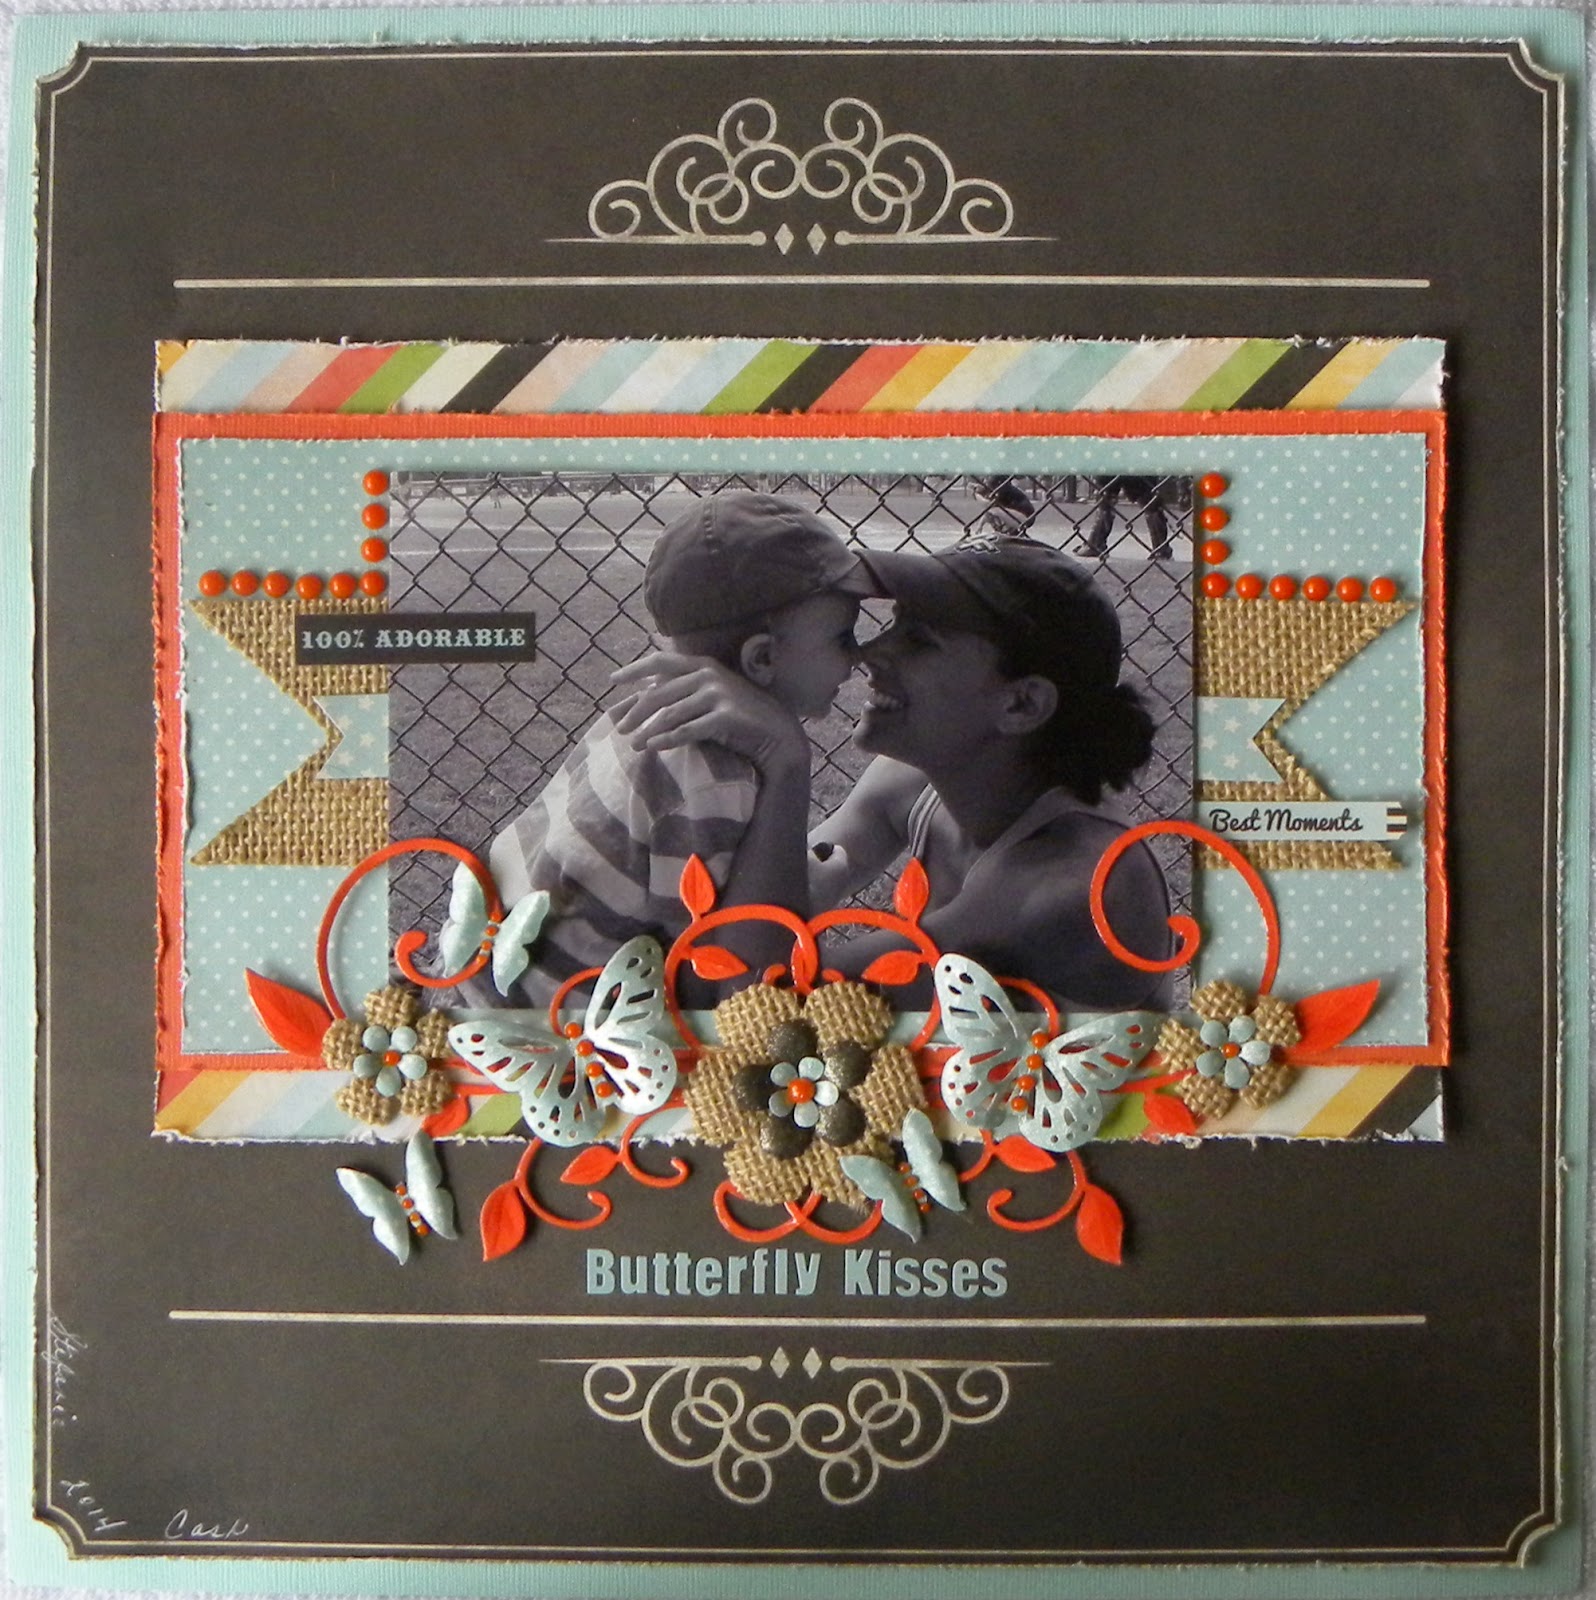
Butterfly Kisses

 Hi, Patti here, this is a Design Team project for Scrapadabadoo!!!  I have used the Memories Captured collection by Fancy Pants and the 6 x 6 Burlap pad by DCWV. I just love this Fancy Pants collection because it's perfect for boys but can be just as much fun for a girly layout too.
 I girlyed (is that a word???) the page up, by diecutting two fancy flourishes by Cherry Lynn Designs and mirroring them which created a heart shape in the center of the page.  I then used some glossy accents to give it some dimension and it also gives it some strength since it's a pretty delicate diecut.
 I then diecut some flowers using the Tim Holtz tattered florals die out of the burlap to tie into the burlap banner under the picture, plus the burlap keeps the flowers a bit masculine.  I layered some punched flowers using the Retro flower punches by EK Success.  I also added some punched butterflies using 2 different Martha Stewart punches.  In order to be able to give them dimension, I double them up.  It gives them a bit more stability so they keep their shape.  I then finished them off by brushing them with some clear Wink of Stella....I LOVE that pen!!!
 I used some foam adhesives to pop up some of the elements for added dimension and interest.
The photo is of my daughter and my 2 year old grandson...he just learned how to give butterfly kisses and thought it was the greatest thing.

Thank you for stopping by and your comments.

http://www.scrapadabadoo.com/item_5165/FP-Memories-Captured-Collection.htm
http://www.scrapadabadoo.com/item_6220/DCWV-Burlap-Stack-6x6.htm
http://www.scrapadabadoo.com/item_219/Sizzix-Bigz-Tattered-Florals-By-Tim-Holtz.htm
http://www.scrapadabadoo.com/item_2825/MS-Large-Monarch-Butterfly.htm